Tuesday, October 30, 2007

Problems

Having problems printing. I've just spent two nights trying to print from my first solid area plate, but having the same recurring problem that I've been having since I first put ink on the press.

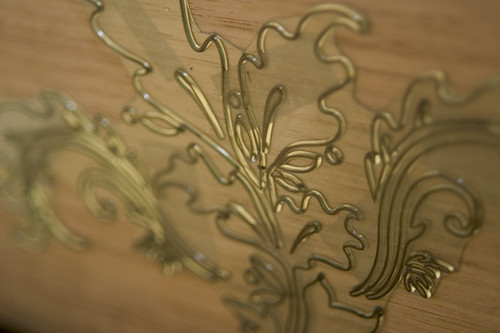
The issue is that an area the length of the plate and one inch high is not inking. If I rotate the rollers 180 degrees, the whole plate inks up again, but after one or two prints, resorts to having an uninked strip again. It's not always the same area. It's less noticeable with line art.

At first, I thought it was that the rollers were sliding over that spot rather than rolling over it. I checked to make sure that the trunks were free of grease, and that the tracks were also clean.

Then I thought that it was because the rollers weren't being completely covered in ink as they ran over the ink disc -- that they didn't complete a full rotation over the ink, and therefore couldn't fully ink the plate.

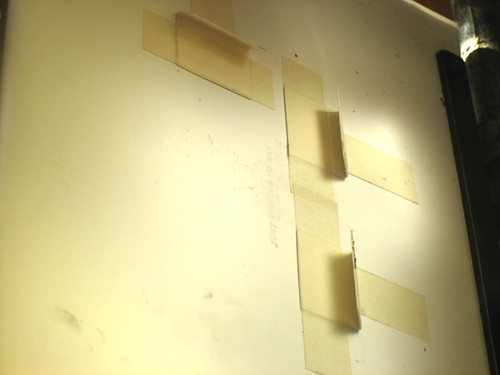
My fiancee discovered that one of the tracks wasn't 100% straight. So we taped it up until it was, but that made no difference either.

Only rotating the rollers a little by hand, and then continuing the cycle seems to ink the plate up evenly, though only for a couple of prints.

Our best guess so far is that the rollers' axis has a bow in it. If this is the case, it's bad news.

I've put in so much work to get this far, and it's really disheartening to discover something like this. I have no idea where to get new complete rubber rollers, and even if I did, it still puts my wedding stationery back a few weeks. It's so frustrating.


I threw out most of the prints before realising I should photograph them, but here's a few pics:

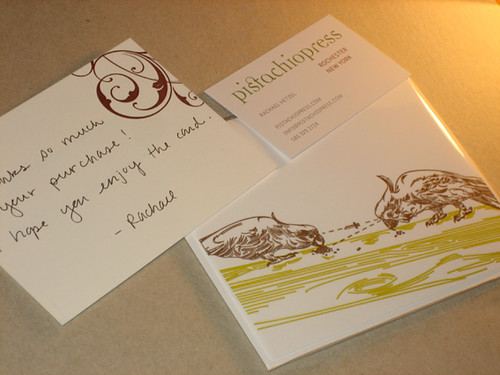
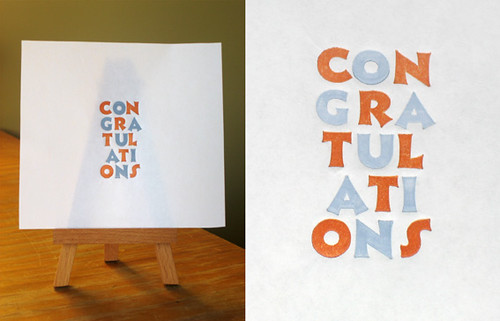
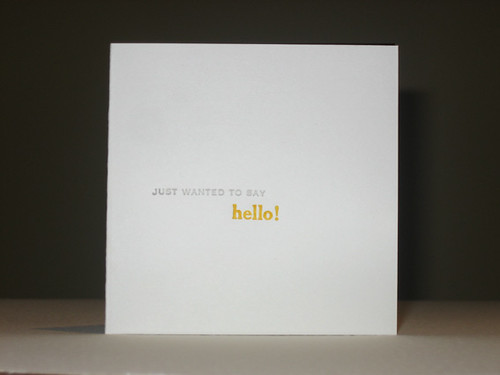
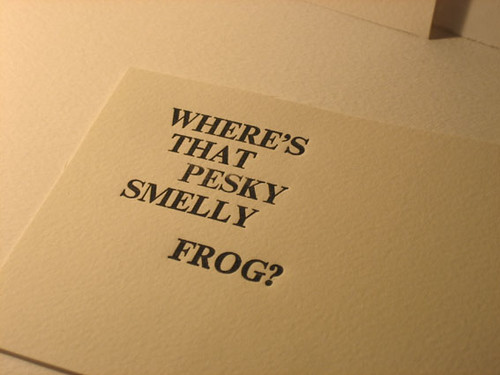
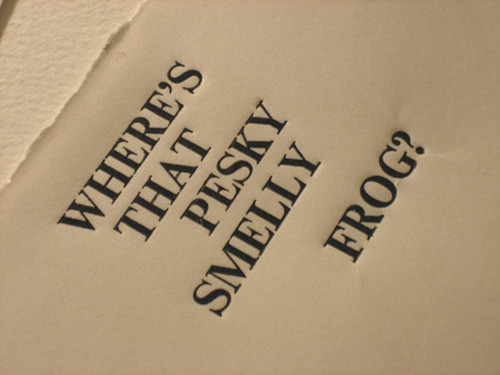
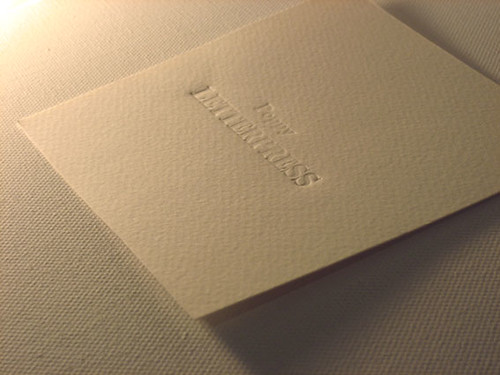
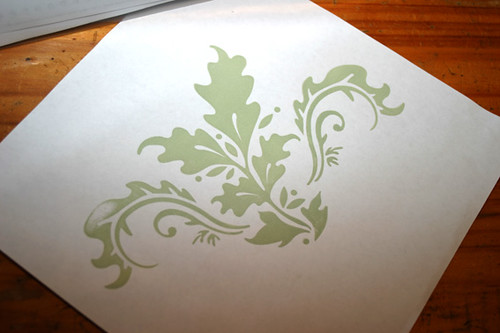
Best print from last night. I ran the ink very heavy, had just a kiss impression to the plate, and rotated the rollers by hand after every print.

The plate tonight. Not a great example, but you can see the uneven ink distribution on the plate across one section. Rotating the rollers by hand fixed this for a couple of prints.

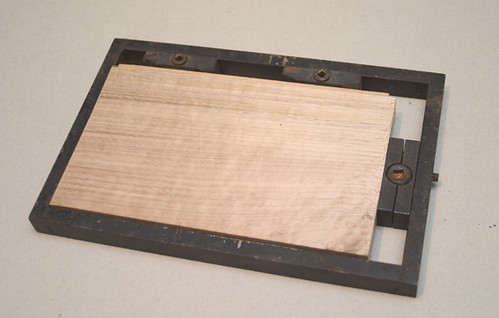
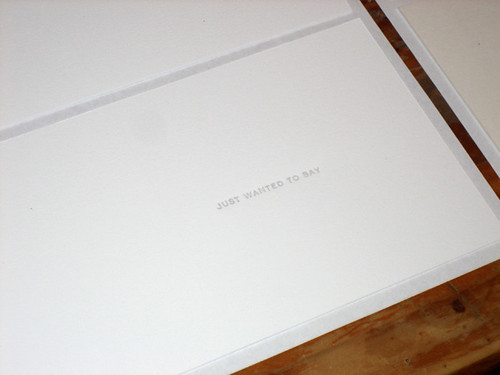
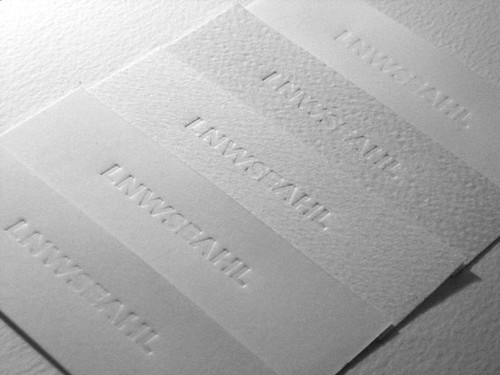
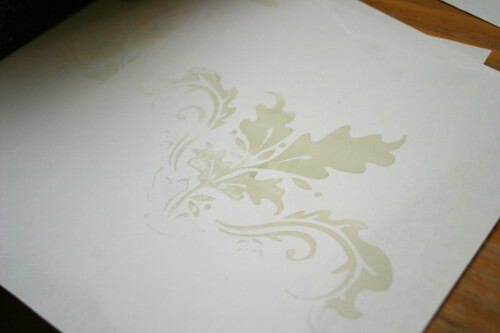
Example of a dodgy print from tonight. Notice the line of absent ink halfway down the print.

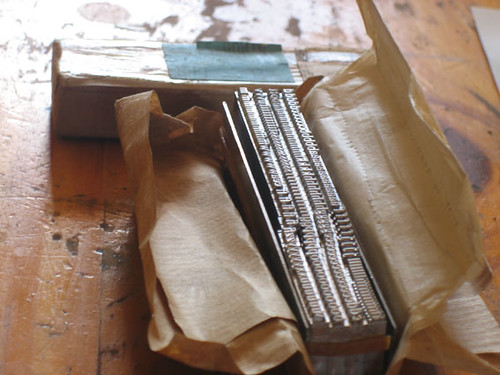
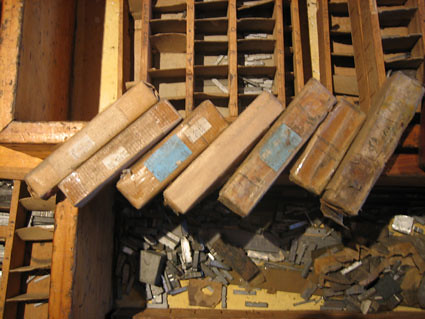
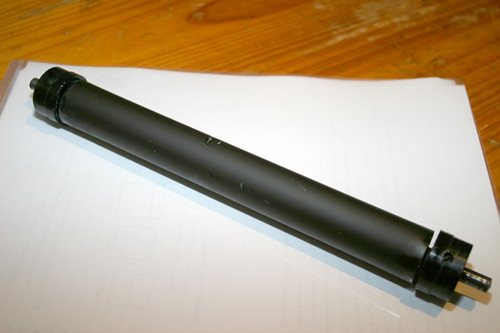
One of my rollers during the cleaning process. Both of the rollers for my eight-five have a few knicks in them which, surprisingly, haven't seemed to produce 'holes' in prints.

&Duck mentioned in the previous post's comments that double sided tape can cause problems and that spray adhesive is a better idea (which I'll be doing from now on), but after fiddling with this plate, I don't believe that's the cause of my inking problems.

Any suggestions would be appreciated. I'm at a loss here.

Saturday, October 27, 2007

First photopolymer print

Today was first proper opportunity to print from my new polymers. I think it went rather well.


I'm really keen to print the first colour of my giraffe and rabbit illustration, but I need more paper to do that. Today's prints were just done on standard office paper, as they were just a test.

Thursday, October 25, 2007

All bases covered

Never admit defeat. If you can't find someone that makes wooden bases for photopolymer plates, damnit, make them yourself!

... and then when you can't find timber that's the height you need for your base, find something a little too low and glue MDF on top. Clamp tight, leave overnight and presto!

Hrm, but MDF should be cut outside, and it's pouring out there. Will have to cut tomorrow. Damn. No printing tonight.

But wait! My delightful fiancee just suggested using two sheets of thick card that we've got lying around for tonight. This way, I can actually print something, which is fantastic because I'm getting sick of not being about to print anything.

So tonight, dodgy job that might work. Tomorrow, make the real deal. I've got enough to make 6 wood blocks, 185 x 110mm. Is this finally the last hurdle conquered??

Wednesday, October 24, 2007

First plates


These little polymers are worth their weight in gold to me today (well, probably more than their weight, they're very light...)


Can't get printing with them yet as I need a suitable base. I did borrow one today from Ampersand Duck, but, just my luck, the base was 1mm too wide for my chase! Argh!

Tuesday, October 23, 2007

Neg film ready!

Very exciting letterpressing day today. Once again, no printing done by me, but look what arrived in the mail from etsy today:

From Pistachio Press. Blog here.

From Satsuma Press. Blog here.


But even more exciting was picking up my first neg film for the photopolymer plates today:


This sheet of film has about an A3 sheet's worth of designs that include my Save the Date cards (two colour), giraffe & bunny design (two colour) and a few swirlies for good measure. Can't wait to print these.

Monday, October 22, 2007

File sent!

Today I emailed my first plate designs to Monaro Printers to get film made for plates!

Sunday, October 21, 2007

Vector-making


Apologies for my lack of blogging in the past couple of days. Truth be known, I'm hanging out to print graphics now. There's only so much I can do with my limited amount of small type. So this weekend I've been sketching ideas for illustrations to use on greeting cards, as well as designing the "Save the Date" cards for our wedding. I figure if I send out these cards, I'll have more time to work on the actual invites, and not have to worry about people missing out on vital information.

Above is a preview of an illustration I created this afternoon that I'm having converted to film tomorrow. Nervous that I've started with something a little too complicated and that it won't come out well on a plate... but we'll see! If it does work, they'll be pretty cute.

So I'll be posting updates soon with progress on these prints once the plates are done.

Thursday, October 18, 2007

Breakthroughs!

Another day at home with the sniffles, a dry throat, lots of orange juice. I did, however, manage to get out to see Ampersand Duck and her school's fantastic book studio. Much envy!

It was a little surreal to see a full working studio, and talk to people who actually DO letterpress - not just blog about it, have informative websites, or run print businesses and supply stores. Sounds weird, but it's true. I can also understand how it would be so much easier and faster to learn from a course or workshop, rather than picking up information from the web. I've heard a lot of people say that letterpress is just something you can't learn from reading websites and books. I guess it's true to an extent, but if you're determined, you'll find the information you need, it may just take longer.

After quickly seeing &Duck's copies of these two books, I've decided I need copies too! I've now ordered Letterpress: New applications for traditional skills from Paperchain and will order Letterpress Printing: A manual for modern fine press printers from Oak Knoll Press next payday.


After exploring a couple of possible places that could make photopolymer plates for me, &Duck's going to help me by casting my plates from film I'll get made by Monaro Printing in Hume (just around the corner from where I live!). So good to know that I can get it all done locally!

Also, I've been using Yupo paper for tympan paper, for lack of something better. It's been working pretty well, but now thanks to &Duck, I've got some of the real stuff to play with. A good thing about the eight-five: you can use other printer's cutoffs because it's so small. This is a pic of some of the tympan paper with &Duck's student handout packed full of great info.


So it's been a good letterpressing day for me today, even though I haven't touched the Adana. I'm so grateful that there's someone like &Duck in my city! Woot! :)

(Ok, so this post ended up being a mini fanclub tribute to &Duck... sorry! hehe)

Wednesday, October 17, 2007

Waiting game

Well, SCP can create my plates for me (metal backed), but can’t mount type high. Not sure if this is something I can do myself easily with much success, but I’d still rather find someone who can do the lot. I’ve waited all day for SCP to call me back with a name/number for a mob that does it all (probably a sign that they’d make my plates too slowly anyway). I'm considering other options as well, must look more into those.

The test plate still hasn’t arrived. I’m such an impatient person.

Tuesday, October 16, 2007

Puzzle pieces

No printing for the past couple of days. Besides having a cold, I'm concentrating more on getting designs organised for plates. The test plate hasn't arrived in the mail yet, but hopefully it will tomorrow.

Most of my days printing so far have been experiments with even impression and trying to calibrate the press. I've heard a lot that the best way to do this is to create a form with a character in each of the corners, and in the middle. I tried that, but was baffled by how to lock them in the corners? So far I've only had to lock type in the middle of the chase. Unfortunately, I'm not very logically-minded.

Lucky for me I just stumbled on this image.

I've got the calibration looking pretty good at the moment, but I think the forme sits out too far, so I might start over again, keeping it as far back as possible so the rollers don't hit the type too hard.

Saturday, October 13, 2007

Registration


My first attempt at two colour registration. It's far from perfect, but for a first go, I'm happy. Today's printing was for testing purposes only, so I just used standard office paper.


I only received one rusty old gauge pin with my presses, so I've reproduced an idea I saw on the Adventures in Letterpress blog (originally from Briar Press). It worked a treat, and I didn't have to worry about smashing gauges.


And just a photo of my Adana, warm in the sun.

Friday, October 12, 2007

Inspirations


I've spent a bit of time in the past couple of days drawing up designs for plates (and possibly my wedding invites). The above green is the main colour for my wedding palette, and a sneak peek at the 'look & feel' of the designs I'm thinking of.

Paul from Parkes Prestige Press has been working with a similar swirly artwork of mine for the past couple of days. Today he produced a test photopolyer plate, but wasn't entirely happy with the results. He's posting it to me to have a look.

Tonight's my night off from printing, which, of course, has lead me to researching on the net again. If I get too inspired, I might just have to go print something. In the meantime, here's some goodies.


Videos

YouTube has some great letterpress videos, especially for someone who's never seen a press in action. I found the following videos really useful when I decided that I wanted to know more about letterpress:


and just out of interest, a short film from Etsy Artist of the Month, Moontree Press about binding your own little booklets.


Colour

If you haven't already discovered it, have a look at Moo cards (http://www.moo.com/). Not only can you create your own cards and sticker books from your own site, such as flickr (http://www.flickr.com/) but they have existing designs that you can have printed as well. How does this benefit the letterpresser? Some of the Moo designs are colour sets (http://www.moo.com/designs/designers/colourlovers/) which are a palette of inspiration (ha ha, sigh).


And look! They even have one that's my wedding colour scheme!


Ink issues

I've been having problems with ink getting pushed out of the impression on the prints I've done so far. It leaves a subtle dark 'glow' of ink around the letters. Is this because the impression's too deep? Too much ink? Wrong type of paper? Erin, on her Adventures in Letterpress blog, noted that it might be the oil based ink.

Thursday, October 11, 2007

Hello!


My first attempt at greeting cards. This was only meant to be a learning process, but it really pointed out that there's a long road ahead for me if I want to eventually produce something good.

Problems with this job:
  • having issues trying to get the whole line/word even. The "J" in grey is heavy, and I just can't get it right. I'm having the same problem with the top of the orange ascenders. I've spent a great deal of time adjusting tympan and impression knobs with little success. Sigh.
  • ink weight vs. impression. I think this will just have to be trial and error... but if anyone out there has a simple formula for this, do tell!

In happier news, I've found TWO places in NSW that can make photopolymer plates. One of the suppliers is looking at some artwork I emailed earlier this afternoon to determine if it will reproduce effectively. I'll post the details when I bring them home from work. I might send an artwork to each to compare results. I think for wedding invitations, I'll have to go with a magnesium plate from Owossa Graphics, though.

Although I'm learning rather quickly, I'm not sure if there's a specific type of project I should start with, like an assignment - i.e. single big word prints, line art, solid art, plates, lines of text, single colour, multiple colour, kiss impressions... Any suggestions?

Wednesday, October 10, 2007

Just wanted to say...


These are my first attempts at small greeting cards. First colour grey, second colour applied tomorrow. 14 cards altogether, printed on 7 different paper types.

It was hard to judge how much ink was enough with such a light colour. I started off really light, adding more ink after a couple of sample prints. Then reached a point where it was a bit too much. The impression is even except for the "J" which is too heavy, but it was the best result I could get at this stage. Each night I improve a little, which is enough incentive to keep going.

A big pile of A3 samples arrived for me today from Yasmin at RedConnect. Some of today's cards are printed on these samples, as well as samples from K.W.Doggett and some artists papers I picked up from The Art Store. I spoke today with Nicky from Paper Impressions, who is also sending me some samples of Cranes Embassy to test out.

I have a couple of leads to chase up for Australian photopolymer plates tomorrow. I also have to start designing a couple of plates to send to Owossa Graphics. I'll be a busy bee for the rest of the week!

Tuesday, October 9, 2007

New ink


Today I went back to Prestons Graphics and bought four 1kg tins of ink from David: opaque white, Pantone Yellow, Pantone Red, and Pantone Blue. Thought I'd stick with the basics and mix what I need. For custom jobs in the future I might get PMS colours mixed by David, but for now, this is more than I need.


I spent part of my night opening up the new tins and mixing baby blue, baby pink and orange, which I'll save for later in the week.


David also had a couple of contacts for photopolymer plates in NSW. If I can find someone nationally, then I'd rather go with them. But I've also had a look at Owosso Graphics in the US, after being pointed in their direction by two people now. So it's comforting to know that I've got a few leads to go on. I tend to be obsessive until I find what I was looking for (hey, that's how I ended up with two Adanas afterall!).

Monday, October 8, 2007

Inky fingers

I started tonight by running a test line of type over 5 new types of paper that I've collected. I love this font, but unfortunately, these few letters are all I have of it.

Time to put ink on the ink disc and rollers for the first time. The mechanism that turns the ink disc by a couple of degrees with each rotation is missing a bolt, so I had to do it manually instead. I think that's the first thing I'll be fixing!

Random words for the sake of printing something...


I assume it's easier to clean type when it's still in the chase? I need to get an old toothbrush for those fiddly bits.


So things I've learned today:

  1. Ink is messy. Holy cow.
  2. I need more space. I need places to dry prints.
  3. Cleaning up isn't as hard as I thought it would be.
  4. I'm still a perfectionist. This is only day 3 of using my press and I'm cranky it's not worthy of a gallery hanging.
  5. I'm starting to get better at creating even impressions. The knobs still have to be adjusted after every forme change, which I don't think is right, but I'm getting there.

As much as it frustrates me, I'm absolutely loving this. I can't wait to try new colour (black gets dull quickly). Hard to believe all of my equipment only arrived 4 days ago...

Still looking for somewhere to create photopolymer plates from electronic files. I hear magnesium lasts longer, but is much more expensive. Drop me a comment if you know of any Australian suppliers.

On another note, my packing and tympan system rocks. Will have to take pics of that next time.

I spent a good part of my day talking to paper merchants about the best paper to use. Nathan Doggett from K. D. Doggett spent some time with me on Friday discussing this. His samples arrived today, which is what I was printing on tonight. Russell from Chapel Press is a lovely fellow and had a chat about paper and photopolymer plates, too. I've found that people in the letterpress community are so helpful and genuine.

Thanks to megan and Ampersand Duck for their nice comments! Megan I've heard so much about Crane's Lettra paper, but can't find it for sale (other than precut cards with borders) in Australia. Chapel Press recommended Somerset as a similar product, so I'll have to find some of that now. Ducky, I've emailed girlprinter, thanks for the tip :)

PS. Blogger sucks for editing paragraph styles...

Sunday, October 7, 2007

First impressions


These two photos show the best I could muster today. Having issues trying to calibrate the impression knobs behind the forme to get it even. But for the life of me, I can't make sense of it. It's not obvious what I should be adjusting when the impression's deeper on one side than the other. Deep on one side, so adjust the corresponding knob? Wrong. It's been trial and error, and when I get it right, I have to start all over again for a new form. Shouldn't it be a once-in-a-while thing, not for each new forme? Confused. It really is the sort of thing you need to see someone else do right first.


Oh, the blue paper is a sheet that I made a couple of weeks ago. Would be nice to be able to print on my own handmade paper.


The rest of my day has been spent sorting type into cases, so at least now I have Gill Sans all organised.


I've also been trying to source an Australian company that can create my plates for me. My aim is to print my wedding invites from plates, but time's running out. They really should be in the post within 4 weeks from now...

Saturday, October 6, 2007

First print on the eight-five

So after a full day, I have sorted all of my loose mixed type into font categories. I can't believe it's taken this long. Right now they're all in neat little piles, which tomorrow I have to organise into their typecases. Out of this mess, I found Gill Sans regular, italic and bold in various sizes from 6pt to 12 pt; Times Roman in 8pt, 10pt, and 12pt; and a couple of other fonts that I haven't yet identified. Nothing terribly exciting, but considering I wasn't sure if I was getting any type with the presses, I'm rather happy.

If I can get organised in the next month, I'd like to print my wedding invites. To do this though, I'll need to print from plates. For the life of me, I can't find out where to get them made. I assume that most letterpress printers make their own. I'll have to keep looking.


This is my 'studio' at the moment. I'm getting ideas of how I'd like to set this room up permanently.

This is the Times Roman 8pt that I found in the boxes, all wrapped up since new. The rubber bands and sticky tape holding the package together were deteriorated, and the paper was a bit mouldy. My guess is that they were purchased some 20-30 years ago, and never opened. I also found Times Roman 10pt and 12pt.

Below are my big achievements for today. After organising type all day, I locked up a chase this evening and started experimenting with impression. It doesn't matter how much you read about it all, you really can't learn until you try it. A bit of trial and (a lot of) error, and this was the result. Heavy on the outside, light on the inside, but it's a start!

Couldn't help but ink up the type and have a go. I still need to clean the eight-five before I start printing on it, so for now I inked the type manually with a hand roller (hence the horrible coverage). This was using the Pantone ink that I received yesterday from Prestons. I think I'll be going back there to get more colours next week.

Things I learnt today:
  1. Adjustments made with the impression knobs behind the form aren't as easy as I first thought. It's not always obvious which knob to adjust.
  2. Strathmore wasn't the best paper to start with.
  3. Staring at tiny type all day gives me sore eyes.
  4. The composing stick is my friend. Especially when sorting type.
  5. I need more storage already.
  6. And the most obvious enlightenment I received today - after trying to pack the tympan with little luck (hard to do when you've never seen it done before!), I noticed this on Briar Press:

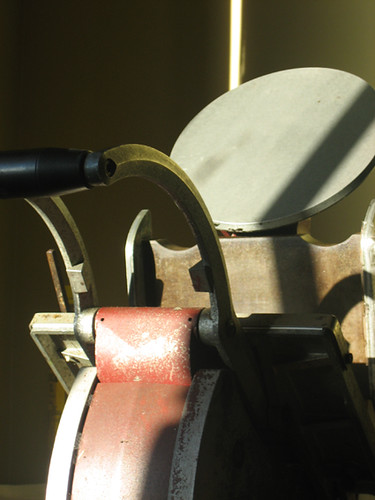
Well, duh. Makes sense, but just not obvious enough to me earlier today! I'd been folding the packing over the edge as well as the tympan. This was probably the cause of the light impression in the middle of my type. At least I know now. I'll try again tomorrow with better packing.

In other news, for those of you that haven't yet found it, go visit Sunlit Media's blog, Adventures in Letterpress. Besides inspiring me to create a blog to document my journey, it's been incredibly helpful watching someone else start from the beginning and achieve great results.

Friday, October 5, 2007

Photos

Some more photos of the Adanas and bits and pieces that arrived last night.


Most of it is dirty, nearly all of the type is unsorted (mixed up in the post), but I'm so happy! The rollers of the five-three are sticky and seem unusable, but the eight-five's rollers appear to be okay, just a bit dirty. I have eight or so quoins and two keys, eight chases, and a variety of type and furniture. Type I have includes Gill Sans (roman, italic and bold), Times Roman (inc. bold) which came in very old but still unopened packets, and two or three other fonts that I haven't identified yet.

Closer inspection of the two presses revealed that although the eight-five seems to move well, the mechanism that rotates the ink disks has a bolt that needs replacing. No biggie there. The five-three needs a bit more work - a bolt missing, mechanism on the ink disk snapped, needs replacing. I'm not too worried about that for now though. He was a bonus, as I was only after the eight-five to start with. So I'll fix up the eight-five first, then get to the little guy.


The lovely man at Prestons Graphics (02-6280 4899, Tennant St Fyshwick) gave me a half-full pot of Pantone Black to experiment with. Neither of us were really sure if it would do the trick, but it seems to be the only ink I can source from a local supplier. If it works ok, I'll buy a few different colours and start mixing my own.

Tonight I'll be sorting more type and working out how to best clean the eight-five.